SSMS: Tips and Tricks to Enhance Productivity


Set colours to differentiate between servers/environments

You can set SSMS connection properties to give a visual indication of which server your queries are connected to.

When you connect to a SQL Server instance, click on the ‘Options’ button:

ssms1

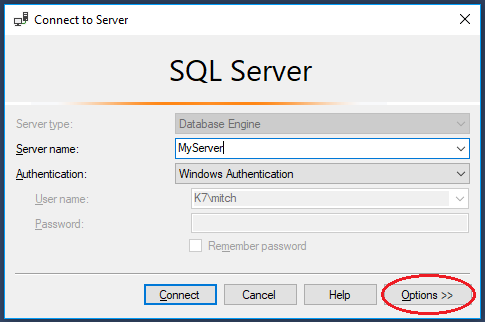
Then click on the ‘Connection Properties’ tab and choose a custom colour for your connection:

ssms2

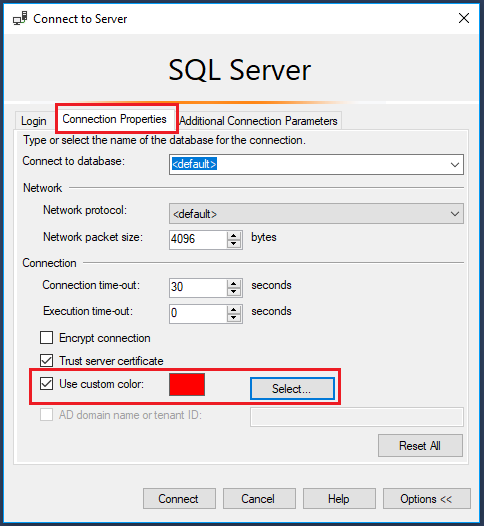
Suggested colours for your environments:

  • Production – Red
  • UAT – Orange
  • QA – Yellow
  • Dev – Blue
  • Local – Green

Once set, every time you open a connection to a server, it will display the assigned colour in the SSMS status bar.

Configure SSMS tabs to only show file names

Follow Brent Ozar’s simple instructions here: SSMS 2016: It Just Runs More Awesomely (It’s not just for SSMS 2016). This makes tabs easier to read and pinning tabs is a great idea for often used scripts. [I also like to set my status bar position to the top of the query window]:

ssms3

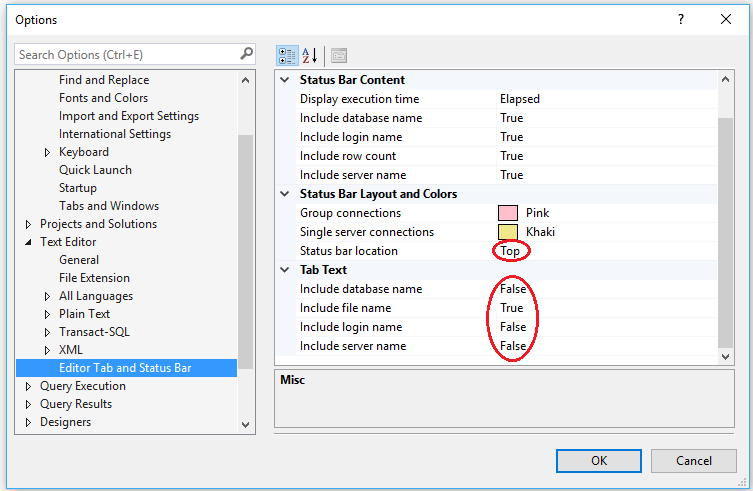
While you are in the Options dialog, go to Tools -> Options -> Environment -> AutoRecover and make sure AutoRecover files is turned on, with appropriate values set.

Cycle through clipboard text

All Windows users will be familiar with the shortcut keys CTRL+C and CTRL+V. The ‘Cycle Clipboard Ring’ feature in SSMS keeps track of last 20 items you have cut/copied. You can use CTRL+SHIFT+V to paste the last copied item from the clipboard just as you would with CTRL+V. If you repeatedly press CTRL+SHIFT+V, you cycle through the entries in the Clipboard Ring, selecting the item you want to paste.

This also works in Visual Studio 2015+

List all columns in a table

To quickly list all the columns in a table as a comma separated list, simply drag the ‘Columns’ folder in Object Explorer and drop it onto a query window. This creates a single line of comma separated column names; if you want to format as one column per line, you can use a search and replace utilising a newline with the regex search option turned on.

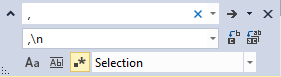
Highlight the comma separated list of columns you just created, type CTRL+H, turn on regular expression searching, enter a comma followed by a space  as the search text, and replace with a comma followed by a newline ,\n

ssms4

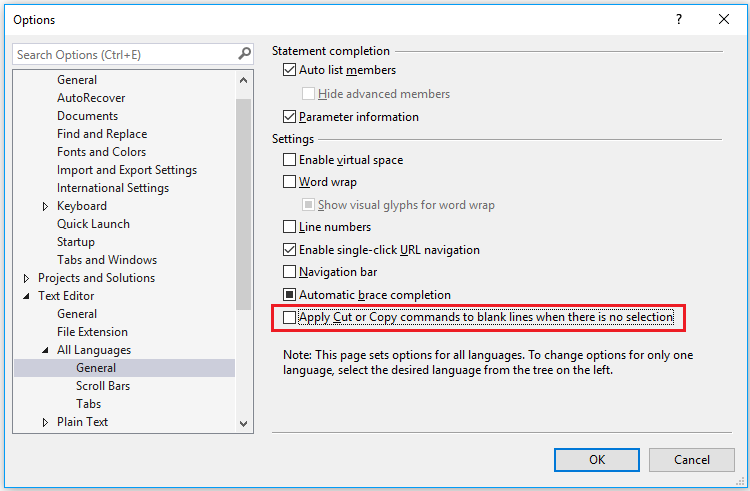
Disable Copy of Empty Text

Ever had this happen to you? You select a block of text to copy, move to the place you want to paste it, and then accidentally hit CTRL+C again instead of CTRL+V. Your block of copied text has been replaced by an empty block!

You can disable this behaviour (I have no idea why disabled is not the default): go to Tools -> Options -> Text Editor -> All Languages -> General -> ‘Apply Cut or Copy Commands to blank lines when there is no selection’ and uncheck the checkbox.

ssms7

Set Tabs to Insert 4 Spaces

Avoid indentation inconsistencies when opening TSQL files in different editors: go to Tools -> Options -> Text Editor -> Transact-SQL -> Tabs -> Insert Spaces and click the radio button. Set Tab and indent size to 4.

Use GO X to Execute a Batch or Statement Multiple Times

The ‘GO’ command is not a Transact SQL statement but marks the end of a batch of statements to be sent to SQL Server for processing. By specifying a number after ‘GO’ the batch will be run the specified number of times. You can use this to repeat  statements for creating test data. This can be a simpler alternative to writing a cursor or while loop.

create table MyTestTable
(
Id int not null identity(1,1) primary key,
CreatedDate datetime2
)
GO

This will run the insert statement 100 times:

insert into MyTestTable(CreatedDate)select GetDate()
GO 100

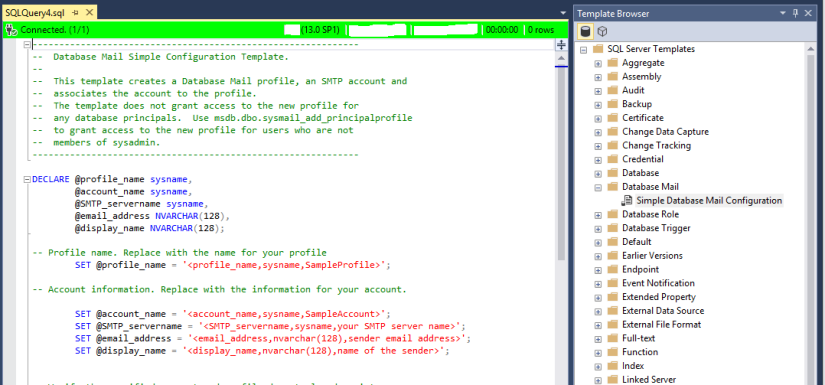
Templates and Code Snippets

Many users are not aware of SSMS’s Template Browser. These templates contain placeholders/parameters that help you to create database objects such as tables, indexes, views, functions, stored procedures etc.

By default when you open SSMS, the Template Explorer isn’t visible.  Press Ctrl+Alt+T or use the View -> Template Explorer menu to open it. One of my favourite templates is the database mail configuration:

ssms8

Template Explorer provides a view of a folder structure inside the SSMS installation, which is located at C:\Program Files (x86)\Microsoft SQL Server\XXX\Tools\Binn\ManagementStudio\SqlWorkbenchProjectItems\Sql

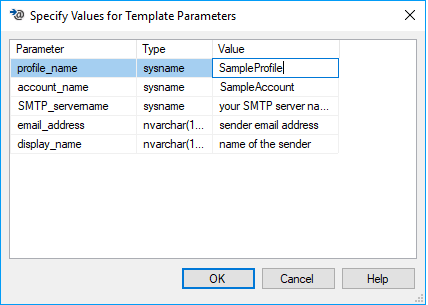
Templates contain parameter place holders: press Ctrl + Shift + M to open a dialog box that substitutes values for the template place holders:

ssms9

You can also add your own templates. Right-click on the SQL Server Templates node of the Explorer and choose New -> Folder and set the folder name. Then right-click on the folder and choose New -> Template. Add your code, with any parameters defined as:

< ParameterName, Datatype, DefaultValue >

Click Ctrl + Shift + M to check the parameter code blocks are well formed.

Code snippets are similar but simpler without parameters. Type CTRL + K + X to insert a code snippet.

Registered Servers

Most users have a number of servers they frequently connect to. The Registered Servers feature allows you to save the connection information of these frequently accessed servers.

You can create your own server groups, perhaps grouped by environment or by project.

Navigate to View -> Registered Servers. Then right-click on the ‘Local Server Groups’ and click on ‘New Server Registration’, and enter your connection details.

There is also a feature that allows windows only authentication to be used against a central server management server

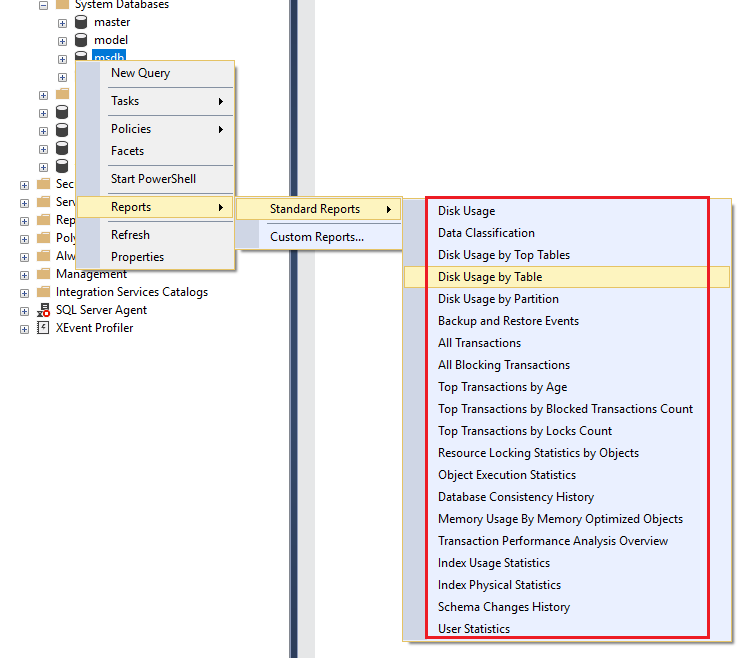
Built in Performance Reports in SSMS

SSMS provides a number of built in standard reports. To access the database level reports, right click on a Database –> Reports –> Standard Reports –> Select a Report:

ssms6

 Useful SSMS Keyboard Shortcuts

Shortcut Action
CTRL+N Open new query with current database connection
CTRL+O Open a file in a new tab with current database connection
CTRL+R Toggle between displaying and hiding Results Pane
CTRL+M Include actual query execution plan
CTRL+L Display estimated query execution plan
CTRL+TAB Cycle through query windows
F4 Display the Properties Window
CTRL + ] Navigate to the matching parenthesis
CTRL+ALT+T Open Template Explorer
CTRL+SHIFT+M Specify values for Template parameters
CTRL+K+X Insert SQL code snippets
CTRL+SHIFT+U Change text to upper case
CTRL+SHIFT+L Change text to lower case
CTRL+K+C / CTRL+K+U Comment / Uncomment selected text
CTRL+F / CTRL+H Find / Replace

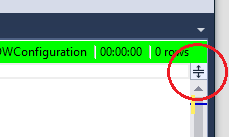
Splitting the Query Window to work on large queries

The query window can be split into two panes so that you can view two parts of the same query simultaneously. To split the window, simply drag the splitter bar at the top right hand side of the query window downwards. Both parts of the split window can be scrolled independently. This is useful if you have a large query and want to compare different parts of the same query.

ssms5

Vertical Block Select Mode

This is a feature I use often. You can use it to select multiple lines or a block of text over multiple lines, you can type text and it will be entered across all the selected rows, or you can paste blocks of text. To use it, hold down the ALT key, then left click on your mouse to drag the cursor over the text you want to select and type/paste the text you want to insert into multiple lines.

Keyboard Shortcut – ALT + SHIFT + Arrow Keys
Mouse – ALT + Left-Click + Drag

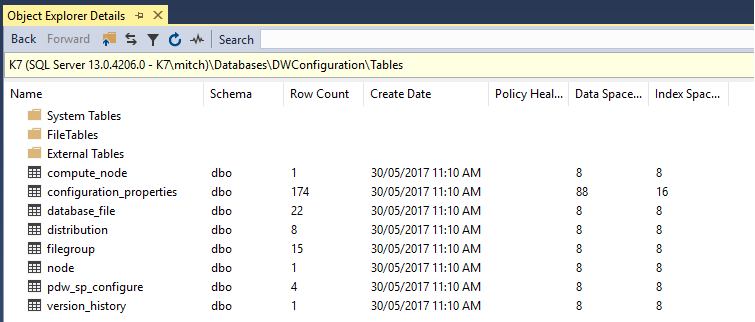
Object Explorer details

The Object Explorer Details window is a feature which very few developers use (including me, as I always forget it’s there!). It lists all the objects in a server and additional information like Row Count, Data Space Used, Index Space Used etc. It’s a quick way to see table row counts for all tables in a database.

The Object Explorer Details window is not visible by default. Click F7 or navigate to View -> Object Explorer Details to open it. To add columns, right click on the column header row and select those columns you want to see.

ssms10

Display Query Results in a Separate Tab

If you want to focus on the results after you run a query, and would like to give it as much screen real estate as possible, go to Tools -> Options -> Query Results -> SQL Server -> Results To Grid and enable the option “Display Results in a separate tab”.

What is Feature Engineering?

These are my notes that I condensed from here:

https://machinelearningmastery.com/discover-feature-engineering-how-to-engineer-features-and-how-to-get-good-at-it/

Feature engineering is the technique of extracting more information from existing data. You are not adding any new data, but you are making the data you already have more useful to a machine learning model.

From https://en.wikipedia.org/wiki/Feature_engineering :

Feature engineering is the process of using domain knowledge of the data to create features that make machine learning algorithms work. Feature engineering is fundamental to the application of machine learning, and is both difficult and expensive. The need for manual feature engineering can be obviated by automated feature learning.”

The feature construction/enrichment process is absolutely crucial to the success of machine learning (with the exception that many neural networks do not require this step to perform well). Feature engineering enables you to get the most out of your data for building predictive models.

Feature engineering is performed once you have completed the first data exploration steps:

  1. Variable Identification
  2. Univariate, Bivariate Analysis
  3. Missing Values
  4. Imputation
  5. Outliers Treatment

Feature engineering can be divided in 2 steps:

  • Variable Transformation
  • Variable/Feature creation

Variable Transformation:

  • Scaling and Centering (termed Standardisation): Standardisation is essential for scale dependent learning models such as Regression and Neural Networks. This technique ensures numerical features have a mean of 0 and a standard deviation of 1
  • Normalisation: restricting to a min-max range

Variable/Feature creation:

  • Missing data Creation using domain knowledge, possibly gained from the data or a domain expert (overlaps with Missing Values/Imputation)
  • Feature Selection (selecting the most important features): Investigating feature correlation
  • Creating new features (hyper-features) by combining existing ones, such as summary data (min, max, count) and discretised data

Feature Engineering Concepts

Categorical Feature Decomposition

Imagine you have a categorical feature “Cabin” that can take the values:

{A, B, C or Unknown}

The Unknown value is probably special, representing missing data, but to a model it looks like just another categorical attribute.

To encode this extra information you could create a new binary feature called “HasCabin”, taking the values 1 and 0 when an observation has a cabin or when the occupancy is unknown, respectively.

Additionally, you could create a new binary feature for each of the values that ‘Cabin’ can take: i.e. four binary features: Is_CabinA, Is_CabinB, Is_CabinC and Is_CabinUnknown.  This is often referred to as ‘One-Hot Encoding’ [Python’s Pandas library has a built-in method to perform this called get_dummies() ]

These additional features could be used instead of the HasCabin feature (if you are using a simple linear model) or in addition to it (if you are using a decision tree based model).

DateTime Feature Decomposition

Date-times are essentially integer numerical values that contain information that can be difficult for a model to take full advantage of in a raw form.

There may be cyclical/seasonal relationships present between a date time and other attributes, such as time of day, day of week, month of year, quarter of year, etc.

For example, you could create a new categorical feature called DayOfWeek taking on 7 values. This categorical feature might be useful for a decision tree based model. Seasonality, such as QuarterOfYear, might be a useful feature.

There are often relationships between date-times and other attributes; to expose these you can decompose a date-time into constituent features that may allow models to learn these relationships. For example, if you suspect that there is a relationship between the hour of day and other attributes (such as NumberOfSales), you could create a new numerical feature called HourOfDay for the observation hour that might help a regression model.

Numerical Feature Transformation

Continuous numerical quantities, might benefit from being transformed to expose relevant information. This includes standardisation which is essential for scale dependent learning models, or transforming into a different unit of measure or the decomposition of a rate into separate time period and quantity.

For example, you may have a ShippingWeight quantity recorded in grams as an integer value, e.g. 9260. You could create a new feature with this quantity transformed into rounded kilograms, if the higher precision was not important.

There may be domain knowledge that items with a weight above certain thresholds incur a higher rates. That domain specific threshold could be used to create a new binary categorical feature ItemWeightAboveXkg

Discretisation

Binning, also known as quantisation, is used for transforming continuous numeric features into discrete ones (categories). A continuous numerical feature can be grouped (or binned) into a categorical feature.

It can be useful when data is skewed, or in the presence of extreme outliers.

In Fixed-width binning, each bin has a specific fixed width which are usually pre-defined by analysing the data and applying domain knowledge. Binning based on rounding is one example.

The drawback to using fixed-width bins is that some of the bins might be densely populated and some of them might be sparsely populated or empty. In Adaptive binning we use the data distribution to allocate our bin ranges.

Quantile based binning is a good strategy to use for adaptive binning.

Postgres Configuration

Configuration file locations:

Where are my postgres *.conf files?

Where is the Postgresql config file: ‘postgresql.conf’ on Windows?

  • Windows: C:\Program Files\PostgreSQL\x.x\data\postgresql.conf
  • Linux: /etc/postgresql/x.x/main/postgresql.conf

Go to bottom of .conf file, and add this line:

include postgresql.custom.conf

Then create file ‘postgresql.custom.conf’ in the same directory and place your customised configuration settings in it. Any settings set in the custom file will override those in the main config.

Navigate to pgtune and enter the required information, and pgtune will generate custom settings based upon total RAM size and intended use etc:

image

Copy the generated settings into file ‘postgresql.custom.conf’:

max_connections = 100
shared_buffers = 8GB
effective_cache_size = 24GB
work_mem = 83886kB
maintenance_work_mem = 2GB
min_wal_size = 2GB
max_wal_size = 4GB
checkpoint_completion_target = 0.9
wal_buffers = 16MB
default_statistics_target = 100
random_page_cost = 1.1

Restart Postgres.

Further reading on Postgres performance: http://www.craigkerstiens.com

Do you Encrypt your Remote Connections to SQL Azure Databases?

If you’re not encrypting connections to SQL Azure (or any remote SQL Server instance), then you probably should.

Encrypted connections to SQL Server use SSL,  and that is about as secure as you can get (currently).

[Remember: SSL protects only the connection, i.e. the data as it is transmitted ‘on the wire’ between the client and SQL Server. It says nothing about how the data is actually stored on the server].

Update: Don’t forget to also set TrustServerCertificate=false

SSMS

When you open SSMS’s ‘Connect to Server’ dialog, click the bottom right ‘Options’ button, and make sure you tick the checkbox ‘Encrypt Connection’:

image

SQLCMD

Ensure you add the -N command line option. The -N switch is used by the client to request an encrypted connection. This option is equivalent to the ADO.net option ENCRYPT = true.

e.g.

sqlcmd –N –U username –P password  –S servername –d databasename –Q “SELECT * FROM myTable”

Linked Servers

When creating a linked server to SQL Azure,  the @provstr parameter must be set to ‘Encrypt=yes;’:

-- Create the linked server:
EXEC sp_addlinkedserver
@server     = 'LocalLinkedServername',
@srvproduct = N'Any',
@provider   = 'SQLNCLI',
@datasrc    = '???.database.windows.net', -- Azure server name
@location   = '', 
@provstr    = N'Encrypt=yes;',       -- <<--  Important!
@catalog    = 'RemoteDatabaseName';  -- remote(Azure) database name
go


ADO.NET Connection strings

Add “ENCRYPT = true” to your connection string, or set the SqlConnectionStringBuilder property to True.

[Remember: don’t distribute passwords by sending as plaintext over the Internet, i.e. don’t email passwords! ]

Installing TensorFlow with GPU support on Windows 10

If you have a high end NVidia graphics card and you’re investigating data science with Keras+Tensorflow, then you obviously want Tensorflow to take advantage of your GPU (training times for deep neural networks can be 10 – 15 times faster even when compared to the latest CPUs).

Getting it all working can be tricky: I found this guide that explains the steps: Installing TensorFlow with GPU on Windows 10

Here’s another: How to run TensorFlow with GPU on Windows 10 in a Jupyter Notebook

The Zen of Python

I’ve recently been learning Python with the goal of using it alongside R for data science. It’s got a lot going for it as a language and the package (library) support covers just about every domain you can think of.

Many of the ‘C’ like languages seem intent on creating too much complexity for no other reason than ‘you can’, but Python takes a more pragmatic approach.

I particularly like the Zen of Python (PEP 20):

The Zen of Python, by Tim Peters

Beautiful is better than ugly.
Explicit is better than implicit.
Simple is better than complex.
Complex is better than complicated.
Flat is better than nested.
Sparse is better than dense.
Readability counts.
Special cases aren’t special enough to break the rules.
Although practicality beats purity.
Errors should never pass silently.
Unless explicitly silenced.
In the face of ambiguity, refuse the temptation to guess.
There should be one– and preferably only one –obvious way to do it.
Although that way may not be obvious at first unless you’re Dutch.
Now is better than never.
Although never is often better than *right* now.
If the implementation is hard to explain, it’s a bad idea.
If the implementation is easy to explain, it may be a good idea.
Namespaces are one honking great idea — let’s do more of those!